
Are you looking to incorporate more plant-based ingredients into your cooking repertoire? Look no further than this simple guide on how to make creamy, delicious coconut milk at home. Homemade coconut milk is a versatile ingredient with a rich, authentic flavor that can be used in a variety of sweet and savory dishes. By making your own coconut milk, you can control the quality of the ingredients and avoid any additives or preservatives found in store-bought varieties. Whether you’re aiming to live a more sustainable lifestyle or simply want to experiment with new culinary creations, learning how to make coconut milk is a valuable skill. This easy DIY recipe will walk you through the entire process, from selecting the right ingredients for coconut milk to storing your freshly made batch.
Introduction to Homemade Coconut Milk
Coconut milk is a versatile, nutrient-rich liquid that is extracted from the meat of mature coconuts. It has a creamy, rich texture and a subtly sweet flavor that makes it a popular ingredient in a wide range of cuisines, from Thai curries to baked goods. While you can certainly purchase coconut milk from the grocery store, making it at home allows you to control the quality of the ingredients and customize the flavor to your preferences.
Homemade coconut milk is free from any additives or preservatives, and it can be used in both sweet and savory dishes. In this guide, you’ll learn the simple steps to create your own nutrient-dense coconut milk using just a few basic ingredients.
| Benefits of Homemade Coconut Milk | Uses for Homemade Coconut Milk |
|---|---|
|
|
“Making your own coconut milk at home is a simple way to ensure you’re getting a pure, high-quality ingredient without any unwanted additives.”
Whether you’re looking to incorporate more plant-based foods into your diet or simply want to experiment with new culinary creations, learning how to make coconut milk is a valuable skill. This easy DIY recipe will walk you through the entire process, from selecting the right ingredients to storing your freshly made coconut milk.
Ingredients for Coconut Milk
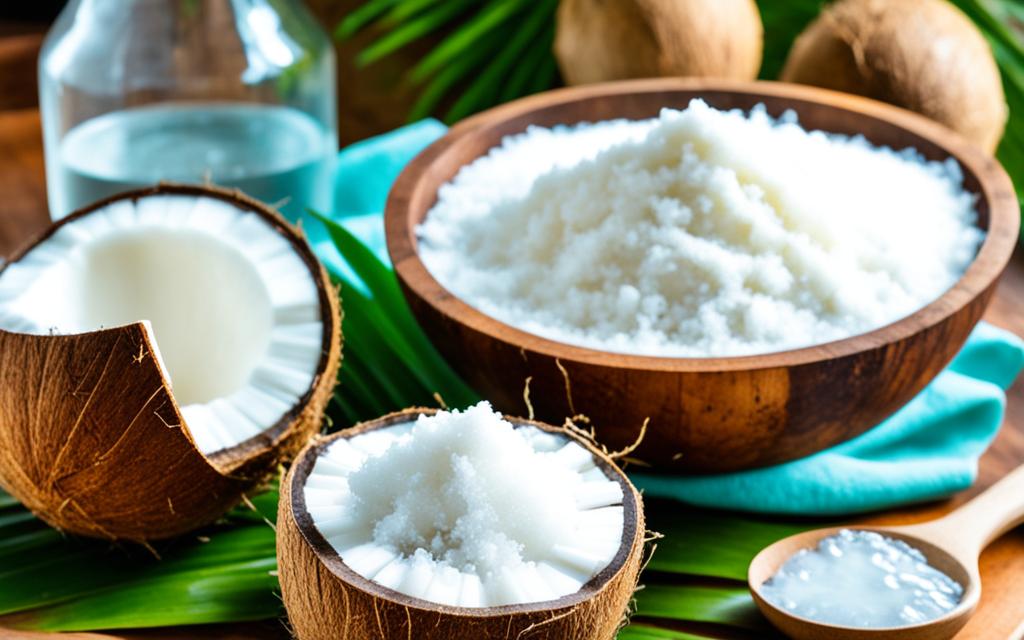
To make your own coconut milk at home, you’ll need just two simple ingredients: shredded coconut and water. The type of coconut you use can affect the flavor and consistency of the final product, so it’s important to choose the right variety. Here are the key ingredients you’ll need:
| Ingredient | Description |
|---|---|
| Shredded Coconut | Opt for high-quality, unsweetened shredded coconut for the best results. You can use either fresh or dried coconut to make your coconut milk. |
| Water | You’ll need purified or filtered water to extract the coconut flavor and create a creamy, rich coconut milk. |
The ratio of coconut to water will determine the thickness and creaminess of your coconut milk. Experiment with different ratios to find the perfect consistency for your needs.
Step-by-Step Guide: How to Make Coconut Milk
Making homemade coconut milk is a simple and rewarding process that allows you to control the quality of the ingredients and customize the flavor to your liking. Here’s a step-by-step guide to help you get started:
-
Gather your ingredients. You’ll need shredded coconut and water. The type of coconut you use can affect the final flavor and consistency, so choose a high-quality, unsweetened variety.
-
Soak the coconut. Place the shredded coconut in a large bowl and cover it with hot water. Let it soak for 30-60 minutes, stirring occasionally, to soften the coconut and make it easier to extract the milk.
-
Blend the coconut and water. Drain the soaked coconut and transfer it to a high-powered blender. Add fresh water and blend on high speed for 2-3 minutes, until the mixture is smooth and creamy.
-
Strain the coconut milk. Line a fine-mesh strainer or cheesecloth with a clean kitchen towel and place it over a large bowl. Carefully pour the blended coconut mixture into the strainer, allowing the coconut milk to drip through while the solids are left behind.
-
Squeeze out the remaining milk. Once the bulk of the liquid has drained, gather the edges of the towel and gently squeeze the solids to extract any remaining coconut milk.
-
Store your freshly made coconut milk. Transfer the milk to an airtight container and refrigerate for up to 5 days. You can also freeze it for longer storage.
And that’s it! With these simple steps, you can enjoy the rich, creamy goodness of homemade coconut milk in all your favorite recipes. Whether you’re making a Thai curry, baking vegan treats, or simply wanting to incorporate more plant-based foods into your diet, this versatile ingredient is a must-have in the kitchen.
Storing and Using Your Homemade Coconut Milk
Now that you’ve mastered the art of making your own coconut milk, it’s time to learn how to properly store and utilize this versatile ingredient. Proper storage is key to preserving the freshness and quality of your homemade coconut milk, ensuring you can enjoy its rich, creamy flavor in a variety of dishes.
To store your freshly made coconut milk, pour it into an airtight container and refrigerate it for up to 5 days. If you plan to keep it longer, you can freeze the coconut milk in an ice cube tray or freezer-safe container for up to 2 months. When ready to use, simply thaw the frozen coconut milk in the refrigerator overnight.
As for using your homemade coconut milk, the possibilities are endless! Incorporate it into your favorite curries, stews, and sauces for a delightful, creamy texture. You can also use it as a dairy-free alternative in baked goods, smoothies, and even coffee. The rich, subtly sweet flavor of homemade coconut milk pairs beautifully with both sweet and savory ingredients, making it a versatile staple in the kitchen. Experiment with incorporating it into your culinary creations and discover the many uses and benefits of this nutritious, homemade ingredient.